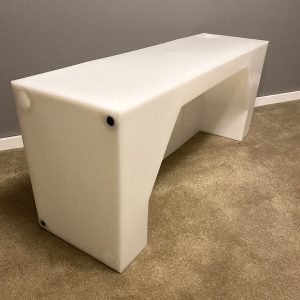
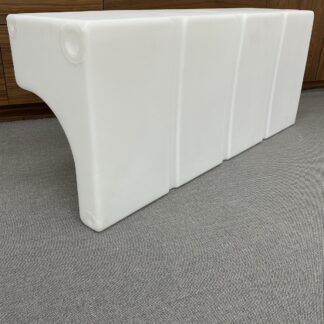
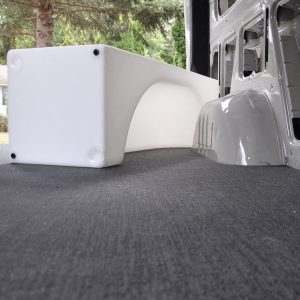
Northwest Conversions wheel well water tanks are great for making the most of your van build space. Our water tanks are designed to fit over the wheel well, optimizing the space and having a lower center of gravity. The tanks are made from BPA Free Food Grade Plastic.
Meet Tyler, owner of Northwest Conversions, giving a presentation of a quick pre-installation of our water tanks of what needs to be done before installing into your travel van. Here are our 22 gallon water tanks that go around the wheel wells. The two water tanks will be going into a Sprinter 144″. The tanks will be connected in series to give a combined volume of 44 gallons of fresh water.
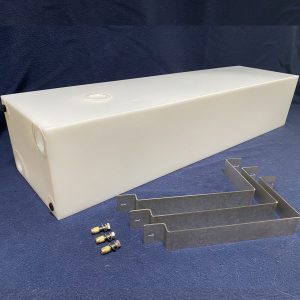
Orientation wise, there will be an emblem on top — NW Conversions — along with an 1.5 inch sensor location or fill port on the top. The ports are an inch and half and half inch. The half inch ports will be provided with plugs. Use a 3/8 inch T-handle Allen key tool to remove the plugs. Reinstall the plugs in unwanted ports along with using plumbers tape or similar to seal the threads.
The 1.5″ ports have a membrane that is water tight. To remove this membrane use a 1 3/4″ hole saw that is just smaller than the threads to drill the 1.5″ ports out that are to be used. Make sure to clean all particles out of the tank before installing fittings. This is easiest to do with an air compressor or vacuum. Once again, use plumbers tape or pipe sealant on all fittings.

Frequently Asked Questions
Do you sell kits for filling the tank and connecting the tank to the sink?
We do not offer “plumbing kits” at this time.
Can you tell me specifically what type of plastic is used for the fresh water tanks please?
The tanks are made from polyethylene plastic. The tanks are food grade, non BPA plastic tanks. Made in Bellingham, WA USA.
Do you recommend an adhesive that I can use on your tanks?
The tanks are made from polyethylene so you would need to have an adhesive that will stick to that substance. Lexel does make some adhesives that may work for you on this application.
What shipping carrier do you use?
NW Conversion water tanks are shipped via FedEx. Shipping is best calculated just before checkout when your address has been entered for accuracy.
Where do you recommend the vent hole and what size? On the top?
The tanks need to be vented. The upper end corners or top port are the normal venting locations. Filling the tank slowly will help as well to reduce the chance of pressurizing the tank. The amount of water coming into the tank and the air going out of the tank needs to be about the same or the tank may expand due to pressure.
How do the water tank ports and NPT threads work?
Our water ports on the tank have female NPT threads, so you’ll need male NPT fittings. These fittings are widely available at hardware stores like Lowe’s, Home Depot, and Amazon. Boat supply stores also typically carry a good selection. Nylon fittings are the best choice for optimal performance. You may try looking for MNPT (male national pipe thread) that will screw into the tank ports.
The ports are 1.5″ NPT (National pipe thread). The measurement comes from the inner dimension of the pipe diameter. The external threads will measure larger than the internal pipe size.
Pipe size is measured by the inside diameter (ID) and the hole saw is measured with the outside diameter (OD). By measuring the port size a 1 3/4″ hole saw will fit just inside the threads and not damage any threads.
Will I have room to insulate the wheel well before installing the tank with a Promaster?
Yes, the tanks are designed to have Thinsulate or similar insulation over the wheel well.
Can I use brass fittings or have you experienced issues with the brass fittings damaging the threaded polyethylene ports?
For fittings, brass will work but we have found that the nylon fittings seem to seat better. The brass and PVC type fittings seem to be a bit sharper and more fine thus making it easy to cross thread. All NPT fittings will work along with thread sealant of some sort (teflon tape) but the nylon seem to be best in our experience.
Does any of your tanks fill over the wheel arch of a Ford Econoline?
Yes, the wheel well tanks will fit the for Ford Econoline vans. The wells of the Econoline are a bit shorter in height.
Can I safely install a heating pad on one of your exterior tanks?
Yes, heating pads can be used on the water tanks. Make sure they are designed to be used with polyethylene material.
Do these tanks need to be vented?
You can typically gravity feed into the water tank and the pump. If the tank is plumbed this way, it must be vented, usually as a vent overflow.
Does the 32 gallons whell well water tanks fit on a Promaster?
Yes, the SP-C-36 gallon tank will fit the Promaster if elevated about 3.5″. Please see the product description. We do also have a 28 gallon Promaster specific tank. (PM-C-28)
Do you make a tank larger than 32 gallons?
Yes, we offer a 36 Gallon Water Tank and a left (SP-L-33) or right (SP-R-33) 33 Gallon Water Tank. There is also the option of having 2 interior tanks with one on each side installed over the wheel wells if you need more water. For the Sprinter van, the capacity can be as much as 72 gallons using the 36 Gallon Water Tank on both sides. This helps balance the weight load over the rear axle. Shop all size water tanks here.
Do you ship to Canada?
Yes, we do ship to Canada, although you will need to manually submit your order. Please use the form on the contact page.
Do you offer a 20-25 gallon over-wheel well water tank for the passenger side of a Chevrolet Express 15-passenger van, fitting forward of the wheel well?
Yes, we have had customers install them in the Chevrolet Express in the past with success. The wheel well of the Chevy is a bit smaller allowing the tanks to fit. Please refer to the product page for measurements of the particular tank you are looking for.
Can your water tanks be used as a graywater tanks?
Yes, the water tanks can be used for either fresh or grey water systems.
Do you have water level sensors to recommand?
Yes, there are several different kinds of sensors to use. You will need to find one that works with your other systems.
KUS makes a sensor that works great with our tanks. Verify that it will work with your monitoring system first as it is a resistive sensor.
How should I secure the water tank to the van?
There are so many different builds and layouts to accommodate the installation and ways to secure the tanks. We have pictures and posts about strapping down the tank. We use bent metal straps for our custom builds that are bolted through the wall and the floor of the van to secure the water tanks.
What is the wall thickness of the water tanks?
Due to the manufacturing process, the thickness of the tanks does vary. Most panel thicknesses are about 3/16″ + / – with the corners be much thicker. We do have a manufacturing minimum standard of 0.1″.
The tanks are made from polyethylene plastic. The tanks are food grade, non BPA plastic tanks. Made in Bellingham, WA USA.
Will your water tanks fit over the dually wheel well?
Don’t see an answer to your question?
Send us your question in the form provided.
Hi Tyler, I have your 20gal wheel well tank lifted 4″ for installation in my Promaster. I was wondering if you are able to make a custom gray water tank to fit side by side between 2 of the underside channels? I think this would be a much-needed and very successful product. It could be a rectangle or square with a 3-4″ dividing divot to fit over the underside frame. Please let me know if this is a possibility. Thank you, Viki
Hi, that is a product we are looking into. It would make a great add for the Promaster. Hopefully in the near future. Thanks for the feedback.
Do you ship these tanks to California?
What method?
Shipping cost?
Thank you.
Have a great day,
Ron
Hi,
yes, we do ship the items. Shipping is best calculated just before checkout for best accuracy. The tanks are shipped via FedEx. Thank you
EXCELLENT TANK!!!
Fast Shipping … I recieved my tank within a couple days of my order, Shipped by Fed-Ex.
Quality Tank … Space saving tank is VERY thick & well designed. I trust installing it in my new van is safe.
Excellent Service … Tyler called me to answer my questions. Good person & great company.
Highly Recommended … I like my NWConversions over-the-wheel tank & so will you.
Buy one today. It’s the best tank you can buy.
Hi Tyler,
Do you sell kits, or know anywhere to buy a complete kit, for filling the tank and connecting the tank to the sink?
-Bob
Hi, we do not offer “plumbing kits” at this time. Possibly in the future. Thank you
About the NPT threads… A quick Google search has me more confused than before. Where have you found appropriate hardware for fill/drain use with your tanks?
Hi,
The ports that are part of the tank are female NPT thread. You should be looking for male NPT. Most hardware shops, lows, Home Depot or Amazon has these fittings. Boat supply stores normally have a good selection also.
Nylon type fittings work the best.
Thank you
Hi Tyler, I’m trying to find an over wheel well water tank that will fit for a Chevrolet Express 15 passenger van on the passenger side of the vehicle. I want ~20-25 gallon tank to fit on and to the forward end of the wheel well
Hi, we have had customers install them in the Chevrolet Express in the past with success. The wheel well of the Chevy is a bit smaller allowing the tanks to fit. Please refer to the product page for measurements of the particular tank you are looking for. Thank you
Is your 32 gallons whell well water tanks fit on a Promaster?
If not, do you havé à suggestion?
Hi, Yes, the SP-C-36 gallon tank will fit the Promaster if elevated about 3.5″. Please see the product description. We do also have a 28 gallon Promaster specific tank.
PM-C-28
Thank you
Do these tanks need to be vented?
Hi, we generally gravity feed into the tank and to the pump so yes, if you are to be plumbing it in this fashion it will need to be vented. We normally treat it as a vent overflow.
Thank you
Hi,
Can you tell me specifically what type of plastic is used for the water tanks please?
Hi,
The tanks are made from polyethylene plastic. The tanks are food grade, non BPA plastic tanks.
Thank you
Where do you recommend the vent hole and what size? On the top?
Hi, the tanks need to be vented. The upper end corners or top port are the normal venting locations. Filling the tank slowly will help as well to reduce the chance of pressurising the tank. The amount of water coming into the tank and the air going out of the tank needs to be about the same or the tank may expand due to pressure. Thanks
Hello we have the ford transit 148 extended dually. will it fit over the dually wheel well? looking at the 32 gallon.
Yes, the tanks will fit the dually but leave a bit of gap between the water tank and the wall of the van.
Thanks
I would like to purchase a SP-R-30 and a SP-L-30. Can I still order these? I am in no hurry to get them but what would you expect the timeline on delivery and cost for shipping to Denver Colorado.
Hi,
Yes, you can order the tanks through the web store. Delivery times and prices vary depending on location.n. For most accurate shipping rates, they are calculated just before checkout. Thank you
Hi Tyler
Are the 20 gal C and R tanks baffled to prevent water from sloshing rapidly back and forth?
Thanks for all your insight
Hi, the tanks are not baffled. There is less “water sloshing” due to the shape of the tank being fairly narrow front to back.
Thanks
Hi,
Would the 21 gallon ‘spare tire’ tank for sprinter also fit a promaster 3500 ext.?
Thanks
We have not tried it on a Promaster. It should fit but would need to have custom brackets made.
Thanks
Tanks arrived within a week and are in good condition. Its been a pleasure doing business with your company!
Do you ship to Canada?
Hi,
Yes, we do ship to Canada. Please send us an email with your shipping details. Thank you
Thank you again Tyler for calling me super fast and directly to solve my problem ! This level of customer service is so amazing! I have already recommended this tank to a ton of people but now I will recommend the whole company! Thanks again!
Thank you very much. We appreciate the order and the compliment. Thanks
Tyler.
Is there any reason the 20 gal. left and right tanks could not be installed on opposite sides?
Hi, all the tanks can be placed driver or passenger side. This allows room for different layouts.
Thanks
Do you make a tank larger than 32 gallons?
Hi, the 32 gallon tank is the largest we make at this time. We recommend having two tanks with one on each side if you are to need more water. This helps balance the weight load over the rear axle.
Thanks
Hi,
Can you recommend an adhesive that I can use on your tanks? I want to mount a water pump to a wood/other material pad. I would like to adhere the pad it to the plastic tank. Thank you.
Hi, The tanks are made from polyethylene so you would need to have an adhesive that will stick to that substance. Lexel does make some adhesives that may work for you on this application. Thanks
Hello,
Any plans for a tank to fit over a wheel well for a van with a dually set up? Ford Transit dually? These vans have less space to save and need this product.
Hi, the dually tank is something we are looking into. The current tanks will all fit with a bit of gap between the wall of the van and the tank.
Thank you
Hi,
How do you recommend people install your tanks? I saw one photo with brackets but the holes seems really small and there were no holes on the bottom. Some images and suggestions would be fantastic. Thank you!
Hi,
The brackets are something we are working on to have also. The picture is for an example of how we secure the tanks.
There are 2 3/8″ bolts through the wall of the van and 2 3/8″ bolts through the floor of the van per bracket.
We are hoping to have these available in the next month.
Thank you
Will I have room to insulate the wheel well before installing the tank with a Promaster?
Hi, yes, the tanks are designed to have Thinsulate or similar over the wheel well. Thanks
A very nice tank but I am having a problem locating 1.5″ NPT fittings. Can you direct me?
Hi,
thank you for the purchase. 1.5″ NPT fittings can be found at most Home Depot, Lowes or online stores.
You may try looking for MNPT (male national pipe thread) that will screw into the tank ports. This might help. Thanks
The 1.5″ ports are actually 1.75″.
The ports are 1.5″ NPT (National pipe thread). The measurement comes from the inner dimension of the pipe diameter. The external threads will measure larger than the internal pipe size. Thanks
Can your water tanks be used as a graywater tank that drains through the floor of the van to a remote emptying connection to avoid an undermount graywater tank that could potentially freeze in cold weather? I’m thinking of a freshwater tank over one wheel well and graywater tank over the other.
HI,
Yes, the tanks can be used for either fresh or grey water systems.
Thanks
Greetings, okay to use heating pad on spare tire tank?
Hello,
Have you ever used one tank as fresh water and another as grey water?
Do you have water level sensors to recommand?
Hi
Yes, you can use one tank as a fresh and the other as a grey water tank. There are several different kinds of sensors to use. You will need to find one that woks with your other systems.
Thanks
Hi Tyler, In one of the threads in February you mentioned you were looking into a tank for a Dually van. Any luck moving forward with that?
Additionally, if you don’t have the dually tank planed for the near future, what is the space between the tank and wall that is left with your 32 gallon tank on a Sprinter Dually do you know?
Thanks in advance
Hi,
Yes, the dually specific tank is something we are looking to provide in the future.
Thank you
This “Installation” section here is VERY VAGUE on how exactly a DIY builder needs to secure/fasten the tank to the side/floor of the van. Is it liability that keeps Tyler from telling us more? I’m using a 30 gal tank on my 2021 Sprinter. I bought some straps from Amazon…but am really curious how others are actually attaching these straps to the wall and floor? Some pictures would be nice. In a roll over, that full 30 gal tank weighs well over 250lbs… Imagine that tumbling around inside during a rollover. I am equipped with Rivnuts but not sure how-to go about it. Are there d-rings or some sort of brackets one would recommend to securely strap this tank down? I’m ready to install, but just am waiting to figure out howexactly to do it right.
Hi, The installation video is a “PRE” installation video to prepare your tank for installation into the van. There are so many different builds and layouts to accommodate the installation and ways to secure the tanks. We have pictures and posts about strapping down the tank. We use bent metal straps for our custom builds that are bolted through the wall and the floor of the van to secure the water tanks. This is an item we have been trying to get ready for the website.
Thank you
Hi Tyler,
Just about to the phase of installing the 32-gallon wheel well tank in our 148 Ford Transit. I have compiled all of my parts, but in reading the above comments and your replies, I see that you suggest nylon fittings. Can I use brass fittings or have you experienced issues with the brass fittings damaging the threaded polyethylene ports? I just want to be sure I do not damage the tank during the plumbing installation process.
Thank you for your assistance and I look forward to receiving your feedback.
Stoked to finally get this installed and put this awesome tank to use!
Best,
Jon & Jen
Hi, Thank you for the purchase of the tank.
For fittings, brass will work but we have found that the nylon fittings seem to seat better. The brass and PVC type fittings seem to be a bit sharper and more fine thus making it easy to cross thread. All NPT fittings will work along with thread sealant of some sort (teflon tape) but the nylon seem to be best in our experience.
Thank you
will any of your tanks fill over the wheel arch of a Ford Econoline?
Hi. Yes, the wheel well tanks will fit the for Econoline vans. The wells of the Econoline are a bit shorter in height.
Thank you
How does one secure the tank? Are there brackets provided? also, you mentioned a 1.5″ plug on the top for a sensor for water level. I see a ton of different options in this area. Can you suggest a sensor with a gauge that mounts in the cabin that you have used in the past
what is the inside dimension on the depth of a 16″ high tank. Need to know for the proper length for a sending unit.
Hi, a 15″ sensor works best for the 16″ tall tanks. The sensor manufacturers recommend about 1″ short of the bottom of tank. Thank you
KUS makes a sensor that works great with our tanks. Verify that it will work with your monitoring system first as it is a resistive sensor. Thanks
Does the 28 gallon for the promaster still need to be lifted 3.5
Hi, The PM-C-28 tank is desinged for the larger wheel wells of the Promaster and fits with stock flooring. It does not need to be elevated. Thank you
What is the wall thickness of your tanks?
Hi. Due to the manufacturing process, the thickness of the tanks does vary. Most panel thicknesses are about 3/16″ +- with the corners be much thicker. We do have a manufacturing minimum standard of .1″
Thank you
This tank sucks without the attachments for the plumbing. Unless you rely on amazon or a specialty plumbing store you won’t find any mpt fitting for the 1.5 port. No housing or trades use that size, if you do buy the tank never cut out the 1.5 port its useless except for the top port to fit the level gauge. Just another example of none trades people doing van conversions without a clue on proper trades sizing and the supply chain.
Hi,
1.5″ NPT is a standard tank size. The fittings are readily available online, hardware shops, Home Depot, Lowes and many other places. If you are having difficulty acquiring components please give us an email and we can help. Thanks
Were our tanks supposed to come with straps to secure them?
Also, what is the best apparatus for filling them.
A list of Amazon links for the extra pieces needed would be wonderful if you guys aren’t going to sell them.
Hi, The tanks do not come with straps at this time.
Tank fill can be gravity or pressure fill among other ways. There are a ton of different options out there to meet your needs an build layout. We are looking to put together small kits for this. Thank you
Hello, I have a 24 sprinter 144 single axle. I would like to install your 36 gallon wheelwell tank. Can these be used for pressure washer application? Should be ok as long as the tank is vented correct? I have been using a 55 gal plastic van for years this way. Thank,Dennis
Hi, Yes,the tanks can be used as a water storage tank for your pressure washer system.
Thank you
Hi. Confuses me with the instruction below. 1 3/4″ is bigger than 1.5″ ports Did you mean 3/8?
“The 1.5″ ports have a membrane that is water tight. To remove this membrane use a 1 3/4″ hole saw that is just smaller than the threads to drill the 1.5″ ports out that are to be used.”
Hi. Yes, it is correct. Pipe size is measured by the inside diameter (ID) and the hole saw is measured with the outside diameter (OD). By measuring the port size a 1 3/4″ hole saw will fit just inside the threads and not damage any threads. A smaller hole saw can be used as well if.
Thank you
Can i assume its ok to install a heating pad on one of your exterior tank?
Hi. Yes, heating pads can be used on the water tanks. Make sure they are designed to be used with polyethylene material. Thank you